


American Museum of Natural History - 10:00 AM Pick
AKC Museum of the Dog - various times
Calvert Vaux Park - 8:15 PM Pick
Calvert Vaux Park - 8:15 PM Pick
Children's Museum of Manhattan - various times Pick
Camp - 11:00 AM
Children's Museum of Manhattan - various times Pick
Camp - 11:00 AM
Bensonhurst Park - 8:15 PM Pick
Ailey Citigroup Theater - various times
Camp - 11:00 AM
Sky Rink at Chelsea Piers - 6:00 PM


Activity Guides
- Beaches & Lakes
- Best Of Lists
- Birthday Parties
- Boats
- Boredom Busters
- Camps
- Childcare
- Christmas/Hanukkah
- City Guides
- City Hacks
- Classes & Enrichment
- Community
- Crafts & Recipes
- Earth Kids
- Easter
- Fairs & Festivals
- Fall Activities
- Family Travel
- Farms & U-Pick
- Free Activities
- GoList
- Halloween
- Holidays
- Hotels & Resorts
- Indoor Activities
- Museums
- News & Openings
- Outdoors
- Parent Talk
- Parks & Playgrounds
- Play Gyms & Sports Centers
- Pools & Spray Parks
- Preschools & Schools
- Restaurants
- Shows
- Skiing & Winter Sports
- Special Needs
- Special Occasions
- Sports
- Spring Activities
- STEM
- Stores & Services
- Summer Activities
- Theme & Water Parks
- Trains, Dinos & Heroes
- TV, Film & Movies
- Virtual
- Visitors Guide
- Weekend Events
- Weekend Trips
- Winter Activities
- Zoos & Gardens
Fall Leaf Craft for Preschoolers: How to Leaf Press and Make Cool Leaf Art
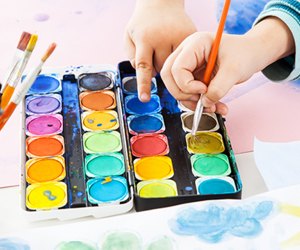
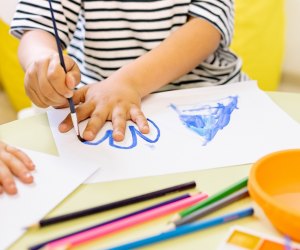
It’s fall y'all, and those leaves outside aren’t just fun for a frolic. One of our favorite fall crafts for preschoolers is to leaf press with tempera paint sticks, and it’s not nearly as messy as you might imagine.
Don’t be fooled by the “paint” in tempera paint sticks, which have the consistency of lipstick and make bright, satisfying marks with virtually no mess. They also happen to be the perfect material for making leaf prints, as we discovered by accident when my toddler colored on a leaf and smacked it on a piece of paper in a fit of rage. His oncoming tantrum was thankfully deflected when we noticed the print left behind.
After experimenting a bit, we found that parchment paper was the perfect match for our leaf pressings, with a slippery surface that grabs right on to the tempera. A big bonus is that it dries super fast, plus the transparent quality of the paper allows the prints to double as simple sun catchers when hung in a window.
Read on for instructions on how to leaf press with tempera sticks and make your autumn an artsy one. Check out our Boredom Busters for Kids Guide for more crafts like this, including our list of 100 awesome art projects for kids. Or, bring some royal flair to your fall with our leaf crown craft.
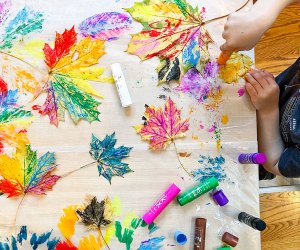
Make beautiful and colorful leaf pressings with tempera paint sticks.
How to Leaf Press with Tempera Paint Sticks
Materials
- Leaves
- Tempera paint sticks
- Parchment paper
- Tape
Leaf Pressing and Printing Steps:
1. Get outside and gather up leaves! Try to choose leaves that look like they’ve fallen recently and aren’t too brittle.
2. Tape a sheet of parchment paper to your work surface. I like to cover the full table if possible. Tape the edges well so that the paper doesn’t move around when pressing the leaves.
3. Lay out your leaves and select one to print. Help your child identify the back of the leaf where the veins are raised and color that side with your tempera sticks. You can use one or many colors. Fill the leaf in as much as possible.
4. Turn the leaf over onto the parchment paper and press it with the color side down. Be sure to press along the edges.
5. Gently pull the leaf up by its stem to reveal your print.
Leaf Press Extensions
Turn Your Leaf Prints into Sun Catchers
Cut your favorite leaf prints out and hang them in the window. Watch the light come through and make the colors shine.
Negative-Space Leaf Prints
While coloring, allow the tempera to go off the edges of the leaf onto the parchment paper. When you pick the leaf up to print with it, you’ll see the outline of the leaf is left behind. Try incorporating these negative-space leaf prints into your craft as well.
Learn about the different types of leaves after collecting them.
Get to Know Your Leaves
Leaf pressing is a great activity for looking closely at nature. After collecting your leaves, consider breaking out a magnifying glass and inviting your child to closely examine all parts of the leaves. You can also look up the different shapes of the leaves and identify the type of tree they came from.
Disclosure: We may earn a small commission if you click through our links and make a purchase. This revenue helps us maintain this site, so thank you for supporting us.
Photos by the author

